Kubernetes Calico: Networking explained
Introduction
Kubernetes networking is a complex topic. There are multiple layers present — from the containers to the underlying infrastructure. Let’s dig in.
Kubernetes defined the network model and the network drivers are implementations of that model. In that way, you can have multiple network drivers implementing the model which makes it modularised. Similar thing to what Docker did.
What does that mean? It means Kubernetes is decoupled from network implementation and it is on the network driver to provide networking functionality but the network driver.
Kubernetes networking
Network driver itself must follow the rules imposed by the model.
The model defines 4 things:
- Every pod has its IP address.
- Containers inside the pod can communicate between themselves.
- Every pod can communicate with another pod in the cluster without using NAT.
- Isolation is defined by the Network Policies.
Apart from network driver one also important component is IPAM.
IPAM is an abbreviation for IP Address Management and it’s responsible for the allocation of IP addresses to the pods.
"The Default network driver which comes bundled with Kubernetes is kubenet."Kubenet is a very basic, simple network plugin, on Linux only. It does not, of itself, implement more advanced features like cross-node networking or network policy. It is typically used together with a cloud provider that sets up routing rules for communication between nodes, or in single-node environments." https://kubernetes.io/docs/concepts/extend-kubernetes/compute-storage-net/network-plugins/#kubenet
As we can see it’s pretty basic and it’s not a full-fledged production solution — except in case the Cloud provider/owner handles the routing tables itself.
Basic IPAM management is host-local IPAM CNI. It’s responsible for assigning IP addresses, on one node.
Kubernetes single node network
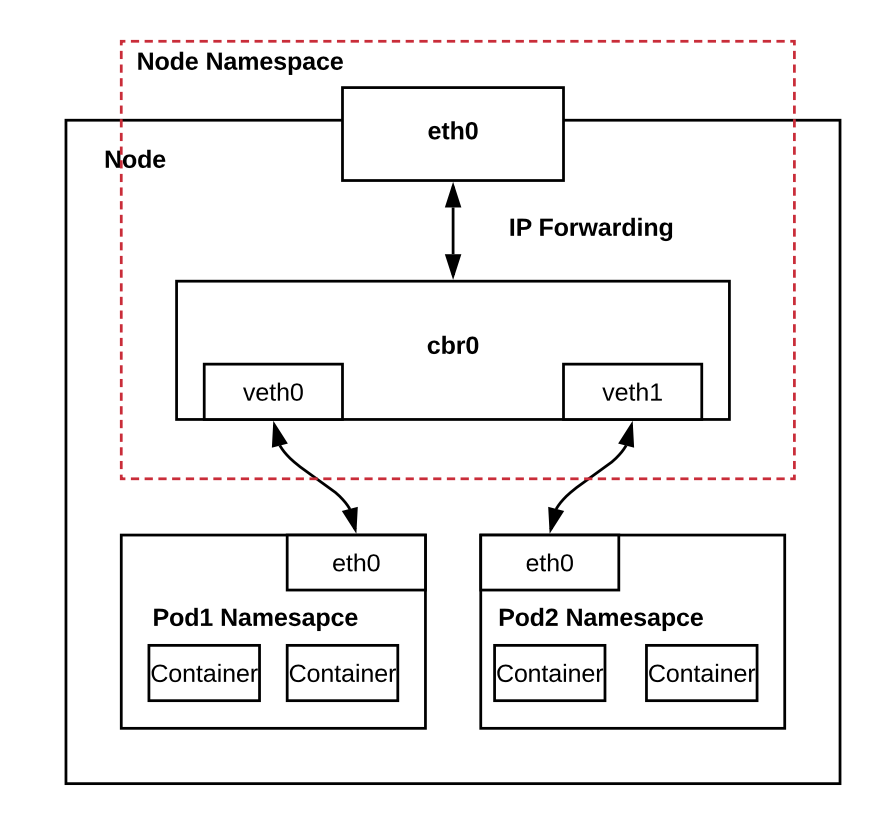
As you can see in the picture, Single node cluster communication (kubenet) is happening over cbr0. This is a Linux bridge type of network interface (Software bridge). All the pods are connected to the virtual interface vethN. They get an IP address from the subnet range of that node CIDR via host-local IPAM. CIDR range is defined on the startup of the node and cannot be changed without re-registering the node. If the request destination IP address is out of the range of that subnet, it will leave via eth0 to the next hop which can be anything.
Containers themselves can communicate via loopback address — this imposes that containers cannot use the same ports in one pod. Something like processes on the host machine cannot use the same ports.
How does the pod get the IP address? A great post is written explaining this in detail: https://ronaknathani.com/blog/2020/08/how-a-kubernetes-pod-gets-an-ip-address/.
Shortly: when the pod is scheduled the CRI pings CNI to fetch an IP address for the pod. CNI pings underlying base plugins till it hits host-local IPAM which returns an IP address falling in the CIDR range of the node itself.
Kubernetes multi-node network
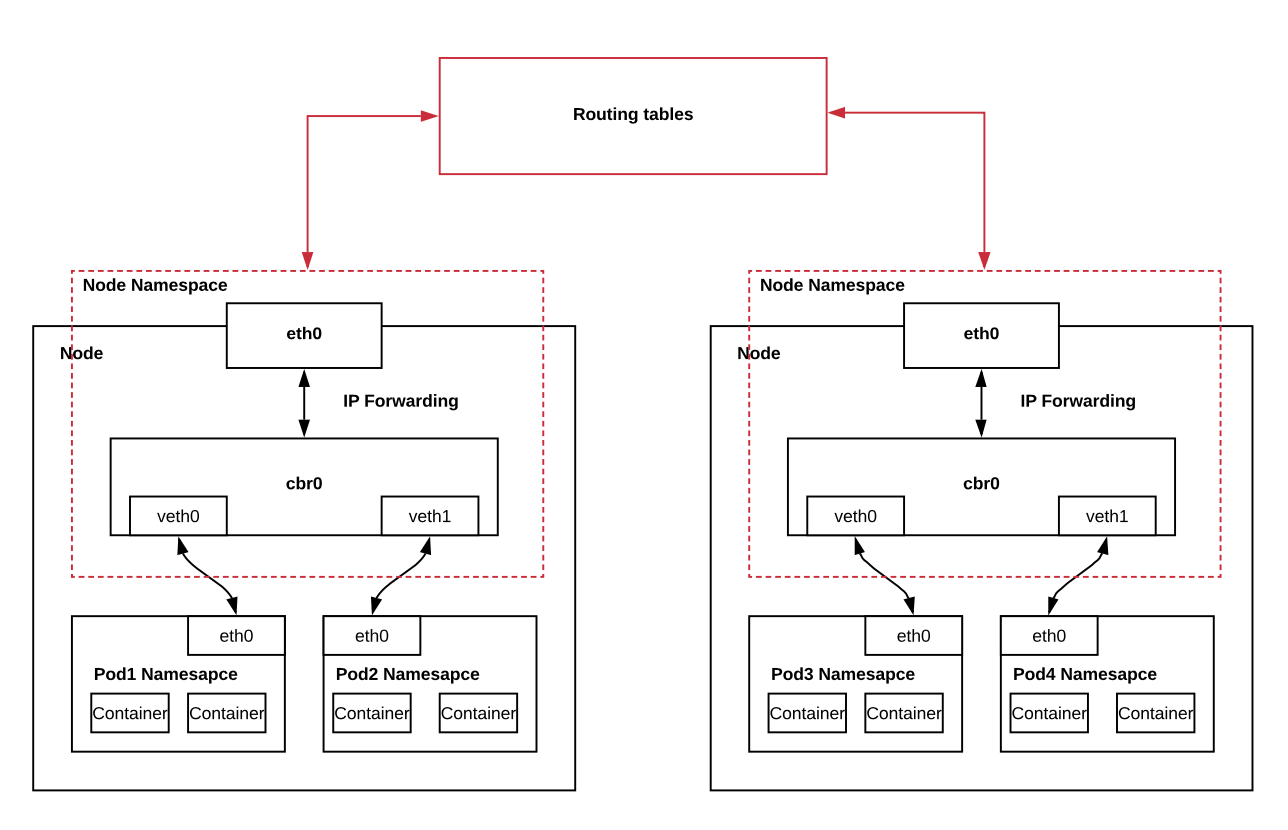
When a cluster has multiple nodes they must be configured to have a disjoint CIDR range. The reason is that IP addresses retain uniqueness. Following this rule, in the image above every pod should have a unique IP address.
But how do they communicate?
Every node has a network agent installed on it. Network agent maintains IP tables eg. kube-proxy. If pod 1 sends a request to the pod on the Node2: cbr0 knows (using iptables; maintained by the network agent) that the IP address requested is on the other node so the request travels to the eth0 and leaves to “Routing tables”.
“Routing tables” are some underlying routing mechanisms that are maintained by the owner of the infrastructure and they know how to get to Node 2.
When the request gets to Node 2, cbr0 on Node 2, based on the destination IP address from the request, redirects it to the correct pod. Again using cbr0 uses iptables to find the right pod.
The unanswered questions here are:
- What are “Routing tables”?
- Who is setting subnets of the nodes?
Kubenet on the Azure
For example Azure allows you to use kubenet as a network driver when they are maintaining “Routing tables”. “Routing tables” are some kind of encapsulation using VXLAN or IP-in-IP. Using some kind of tunneling protocol network driver will respect the promised:
- Every pod can communicate with another pod in the cluster without using NAT.
As for subnets and who is managing them — again the cloud provider should distribute to the node proper IPAM configurations or the network driver itself (implementing IPAM).
Calico network on the Kubernetes
Calico is a whole package networking solution for Kubernetes. It’s not the only one. Alternatives are Flannel, Cilium… etc.
Calico allows the implementation of different types of networks. For example, it’s possible to configure for the packets to be routable outside of the cluster. This means that pods are treated as first-class citizens interoperable with the outside network. This case complicates everything more.
We will focus on the non-routable outside of the cluster to create an overlay network that will handle inter-node communication using encapsulation over the network which is not aware of pod IP addresses.
One of two cases that are supported by Calico is VXLAN and IP-in-IP.
"Calico supports two types of encapsulation: VXLAN and IP in IP. VXLAN is supported in some environments where IP in IP is not (for example, Azure). VXLAN has a slightly higher per-packet overhead because the header is larger. Still, unless you are running very network-intensive workloads the difference is not something you would typically notice. The other small difference between the two types of encapsulation is that Calico’s VXLAN implementation does not use BGP, whereas Calico’s IP in IP implementation uses BGP between Calico nodes." https://projectcalico.docs.tigera.io/networking/vxlan-ipip
Overlay networks are useful on the public cloud where the underlying infrastructure is not aware of the pod IP addresses. Calico is configurable so that you can only encapsulate traffic that is targeting cross subnet addresses.
Calico IP-in-IP overlay network
apiVersion: projectcalico.org/v3
kind: IPPool
metadata:
  name: ippool-ipip-cross-subnet-1
spec:
  cidr: 192.168.0.0/16
  ipipMode: CrossSubnet
  natOutgoing: true
This is enabling CrossSubnet encapsulation using IP-in-IP. IP-in-IP in Calico works in pair with the BGP peering. Calico knows the IP addresses of all nodes and which pod IP address is belonging to which node. This way packet is encapsulated to the target node IP address. After arrival on a specific Node that packet is de-encapsulated and redirected to the right pod based on the initial destination address.
Calico VXLAN overlay network
apiVersion: projectcalico.org/v3
kind: IPPool
metadata:
    name: ippool-vxlan-cross-subnet-1
spec:
    cidr: 192.168.0.0/16
    vxlanMode: CrossSubnet
    natOutgoing: true
VXLAN encapsulation is enabled for the CrossSubnet traffic. IP-in-IP is pretty straightforward. On the other side, VXLAN is a little bit more complex technology. VXLAN enables stretching Layer 2 over Layer 3. Instead of learning IP addresses over BGP, VXLAN sends over data-plane unicasts, multicast, and broadcast (BUM) question/answers for address resolutions requests similar to Ethernet learning addresses.
This way whole cluster is behaving like a Layer 2 switch which is popular in data centers where we need to have dynamic VM migrations retaining the same IP addresses.
Configuring only CrossSubnet encapsulation leaves traffic untouched for the pods in the same subnet.
Calico NetworkPolicy
One important fact is that kubenet doesn’t implement network policies. To enable network policies third-party network plugin is needed.
Calico implements network policies but also extends the one from Kubernetes to give you more control over traffic.
apiVersion: projectcalico.org/v3
kind: NetworkPolicy
metadata:
    name: allow-tcp-6379
    namespace: production
spec:
    selector: color == 'red'
    ingress:
      - action: Allow
        protocol: TCP
        source:
          selector: color == 'blue'
        destination:
          ports:
          - 6379
Kube-proxy vs Calico Felix
As we have mentioned before kube-proxy is the default network agent on the node. Kube-proxy relies on iptables to enforce packet filtering.
Calico’s replacement for the kube-proxy is Felix. What Felix do is: talk directly to the Kube api-server instead of talking through kube-proxy.
Felix also gives the possibility to use eBPF instead of iptables.
What is eBPF? eBPF is a revolutionary technology with origins in the Linux kernel that can run sandboxed programs in an operating system kernel. It is used to safely and efficiently extend the capabilities of the kernel without requiring to change kernel source code or load kernel modules. https://ebpf.io/
So how is Felix leveraging eBPF? Instead of relying on the iptables, Felix uses a bpfpacket filter which gains performance in some cases.
Conclusion
As we can see, Kubernetes networking is a complex topic as it can have multiple layers of networking. Starting from the container, pod, node, underlying infrastructure network, and so on. Providing multiple network drivers also adds a complexity layer as they are all different in some aspects.
The next part of this article will be an installation of Calico using the Tigera operator and hands-on configuration.